


How to Install Starter Strip Roofing Shingles | Mastering the Roof by GAF
GAF – Mastering The Roof (chapter 09)
This video demonstrates the proper installation technique for GAF starter strips; a superior alternative to starter shingles. Starter strips are important for wind resistance. Use WeatherBlocker or ProStart starter strips.
One of the most common sources of failure in a roof system is the improper installation of starter shingles. This starter course is very important, especially for wind resistance.
GAF offers Pro-Start and WeatherBlocker starter strips that are manufactured with a perforated line. This feature is a real time saver by eliminating the need to manually cut and cleanup shingles tabs.
Along with convenience and savings; the Pro-Start and WeatherBlocker products utilizing advanced Dura Grip adhesive to achieve maximum protection against wind blow-offs. Now that we have covered the importance and benefits of GAF precut starter strips lets take a look at they install.
For shingles exposure less than six inches, the use of either Pro-start or Weatherblocker starter strips can be used. For such applications; begin by separating the strip at the perforated line.
When applying shingles with exposures greater than 6 inches, such as the Camelot collection, only full un-split WeatherBlocker starter strip can be used.
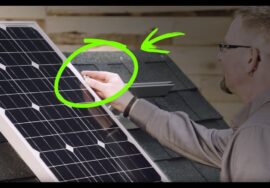
Place the appropriate sized starter strip with the sealant facing up at the eave edge.
For proper water drainage, Both Pro-Start and Weatherblocker starter strip require a one quarter to three quarter inches overhang at all eave and rake edges.
Every Starter strip requires a minimum of four nails driven in a linear fashion one and a half to three inches above the shingle's bottom edge. Begin with the first nail at a distance of one and a half to three inches from the beginning side edge. Space the remaining three nails ten to twelve inches from the previous nail, and the fourth nail one to two inches from the ending edge.
When installing Metric dimensioned shingles, you must trim five inches off the first WeatherBlocker starter strip or three inches off the first ProStart starter strip. This critical step ensures that the starter strip butt joints and overlapping shingles butt joints are off-set a minimum of four inches. Depending on the length of the shingle being installed, A 10 to12 inch section of starter strip may periodically need to be cut and installed to meet the required 4 inch offset. Fasten the adjustment starter strip with two nails one to two inches from each side end.
For maximum wind resistance, starter strips should be installed along all rake edges. Begin by laying the strip with the sealant side up, closest to the rake edge. Position the starter strip so that it overlaps the eave starter strip by at least three inches. As with the eave edges, the Starter strip must overhang the rake edge one quarter to three quarters of an inch. Begin the line of nail fasteners one to two inches from the side edge of the starter strip, and one and a one half to three inches from the rake edge. Complete the rake edge starter course by nailing along a vertical line every ten to twelve inches up the rake until reaching the ridge.
Learn more about Starter Strip Shingles at:


…again if he’s wrong, then why did y’all take the time to watch a instructional video? These videos don’t randomly show up on your screen, if it did, you still watched it! A professional usually don’t enjoy to watch a how to video, the video title is clear.
are these not installed upside down? installed the way this says the sealant on the other side shows.
Not if you nail them down.
the next shingle has a tar li e that seals to the starter. thus is why up put the tar line of the starter DOWN to seal to the drip. then the shingle seals to the starter. wtf. they are just flopping in the wind
@Michael Marchelli doesnt this video show them being installed the wrong way?
They are made specially to be installed on edges of the roof sticky side up to grab the next layer of shingles because the nails will be 5 or 6 inches up on first course this prevents wind from lifting them up:)
Does anyone know if the starter strips going up the rakes are supposed to over lap each other? or butt up against each other? I assume overlap just like it overlaps the eave starter strip but just checking.
Looks like they are butted up next to each other. See 2 minute mark. https://www.youtube.com/watch?v=4cpvFtvCpOo Otherwise your corners may be thicker/ higher than the rest of the roof.
No overlap from piece to piece. Butt joints.
Me arse jokes of the Gap Band, and flatulently sings, “Burn-ing Rubber On Me”, ha ha. But, seriously, how do shingles and roofers hold up under chemtrail conditions? Love, mox.
i so dissagree. i never had any blow off. i do not hang over the drip and the tar line of the starter needs to seal to the DRIP EDGE then the shingle has a tar li e that seals to the starter. creating a sealed system. you just flopping in the wind. less you have a tar line on both sides of that fancy starter. bro.
If you do not install per the MANUFACTURER’s specs the warranty is void. Be sure to tell your customers that the way YOU install won’t be warranted.
How do you know you never had any blow off? You call all your customers every year to check? You’re the typical hack roofer that thinks they know more than the manufacturer.