


DIY: How to Install Under-Deck Roofing
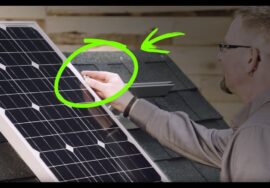
Today we’ll be showing how we installed some polycarbonate roofing panels under our deck to make it water proof. The soffit ended up being very cost effective compared to getting a similar roof installed professionally. All the water gets collected and routed, keeping the patio underneath dry.
We actually built this project about a year and a half ago and despite the abuse of 2 harsh winters, the roofing has held up fine with zero leaks or need of maintenance.
Main Materials Used For Roofing:
• Pressure treated 2X4’s
• 1 ½” Hex-Head Roofing screws
• 3 ½” construction screws,
• Corrugated polycarbonate roofing panels
• Miter saw
• Circular saw
• Drill and driver
• Drill bits
• Nail-gun (optional but helpful)
• Large ladder
Extra Materials Used For Roofing:
• Gutter (vinyl is easier to cut and handle)
• Gutter straps
• End caps
• Downspout and outlet
• Glue for gutter
Music:
Track: The Perpetual Ticking of Time — Artificial.Music [Audio Library Release]
Music provided by Audio Library Plus
Watch:
Free Download / Stream:
This project is heavily inspired by a project from The Family Handyman:
If you enjoyed the video, make sure to subscribe and hit the bell so you stay updated with the channel. Also comment any future projects you want us to do.


Good job, buddy! Simple, elegant and inexpensive.
This is exactly what i was looking for! thank you for the very detailed explanation, and the computer graphics were a nice touch. Very professional.
Well done. Very descriptive. The CAD animation is great! Thank you.
Thanks for the info! Nicely done and super helpful!
Excellent Video, What I am looking for. your explanations are very clear. Good Job guys.
Pretty cool. I’ve been wanting to do this on my deck. You might have some trouble with those spacers after a few more years since they aren’t pressure treated. Otherwise it looks reasonable. Thanks for making the video.
Thanks for the video – nice work! My favorite part: “you don’t have to be super accurate but you should probably be more accurate than this!” It had me rolling??
Glad you enjoyed the video!
Good video, thank you
? this is beautiful
definitely a more cost effective way of completing the task. Not as polished as some of the commercial solutions, but effective. Thanks for sharing.
Hi there! Thinking of doing this to my deck. Thanks so much for the very helpful video! Question: I have a hanging hammock chair attached to one of the joists already. Do you think I could reattach that though plastic or aluminum panels, or would that cause a whole in the water system?
As long as you attach the hammock into the joist with the screws shown (with rubber gaskets), it should be fine. I don’t see how it would be any different from the screws holding the panels to the joists.
This is awesome! 2:15…”Your cuts don’t have to be very accurate, but you should probably try to do better than this!!” And I mean it – perfectly presented and edited!
I loved this part too. It helps us identify where it is easy to make a mistake, so we can try to avoid it. Finally a realistic video!
I liked that part – so rare to include mistakes in a how to video – makes it more real.
I literally love these videos with all my heart. They bring me joy when I am in one of my deep depressions, and without them, I don’t know if I would still be here today (if you know what I mean). Thank you for creating these masterpieces, and if you ever stop, my life will lose all meaning. Enjoy your summer!
I take it you guys didn’t build that deck, correct?
??❤️
Well done guys. Gonna copy ya!
What size are the roofing screw? 1 inch?
They are 1 1/2″
how much was it in material
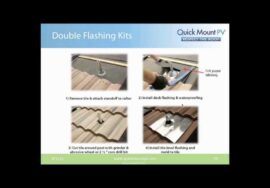
Very nice, I’m looking at doing this myself and your video is a help! Did you consider using flashing on the beam where the roof hits the gutter to protect the beam, or do you find there is not much extra moisture held on that beam?
putting flashing on the beam would no doubt keep excess moisture off of it. We aren’t too concerned however because the beam is pressure treated wood and should last a long time.
Well done, nice video. Cheers!
Thanks!